%STR Function – The %STR Function serves as a way to assign variables within SAS which contain token character data.
Some of these tokens include:
; + - * / , < > = blank # LT GT EQ
Let’s say that, for whatever reason, you wanted to write a very complicated block of code. Within this code block, you want to assign the value:
If var1 = var2 then varflag = 1;
To the variable progvar1.
You would not simply be able to write:
%let progvar1 = If var1 = var2 then varflag = 1;;
Doing so would cause a SAS error as you have an assignment and an "IF" statement all occurring at once. To prevent this from happening, so that you may complete the assignment, and after such, call the newly assigned &progvar1, you will need to utilize %STR.
The utilization of the %STR function for this occasion would resemble:
%let progvar1 = %STR( If var1 = var2 then varflag = 1;);
This not only makes the code appear cleaner, but also allows it to run.
%BQUOTE Function – The %BQUOTE function enables the SAS user to place token character data within a variable without having to match quotation marks.
For example, if you wanted to assign the value:
The Data Scientist’s Blog hasn’t been updated!
to a variable. The utilization of apostrophes would cause SAS to return an error. To prevent this from happening, you would utilize %BQUOTE. The variable assignment would resemble:
%let progvar2 = %BQUOTE (The Data Scientist’s Blog hasn’t been updated!);
This assignment allows progvar2 to maintain the data as if it were a quoted string without having to fuss over syntax.
Friday, April 28, 2017
How to Enable Autosave (SAS)
SAS has a tendency to crash when querying from large data sets. To help mitigate this dilemma, I would recommend always saving program code prior to execution. Another useful feature that can be enabled, is the SAS Autosave. This feature is a standard SAS feature that can be toggled through the SAS Enhanced Editor. From my experience with Windows 10 and SAS 9.4, the SAS Autosave feature is not enabled by default.
To enable the SAS Autosave feature, choose “Tools” from the menu bar of the SAS Enhanced Editor. After “Tools” has been selected, select “Options”, and then select “Preferences”.
You should be presented with this screen:

From the menu, choose “Edit”. After selecting “Edit”, choose the box next to “Autosave Every”, and then select the duration that must pass prior to autosaving.

The file from which autosave files can be retrieved from is:
C:\Documents and Settings\<USERNAME>\Application Data\SAS\EnhancedEditor
This file must be monitored regularly, as it will eventually become filled with autosave files. I would recommend placing a shortcut to the file pathway on the desktop.
To enable the SAS Autosave feature, choose “Tools” from the menu bar of the SAS Enhanced Editor. After “Tools” has been selected, select “Options”, and then select “Preferences”.
You should be presented with this screen:
C:\Documents and Settings\<USERNAME>\Application Data\SAS\EnhancedEditor
This file must be monitored regularly, as it will eventually become filled with autosave files. I would recommend placing a shortcut to the file pathway on the desktop.
Thursday, April 27, 2017
Macro Basics (SAS)
To create a macro (function), you will begin the line of code:
%MACRO <MACRONAME>;
For our example, let’s use the name, “DATABLOG”.
So far, our macro would resemble the following:
%MACRO DATABLOG;
Next, we have to make the macro do something.
This is probably a good time to introduce %DO;
%DO, as it exists within a macro, functions similarly to the way in which functions outside of a macro. As a programmer, you will be using %DO to animate most of your macro functionality. Therefore it is fair to say that %DO, does something within your macro.
Let’s make our macro contain a %DO loop that iterates 5 times.
%MACRO DATABLOG;
%DO I = 1 %to 5;
The “I” counter variable which the %DO loop utilizes, can be referred back to as a variable within the %MACRO.
Referring back to variables in SAS which are assigned by the user in a SAS program is notated with a:
&<VARIABLENAME>;
So, if we were to refer to our “I” variable, the code would resemble:
&I;
To assign values to variables within a macro to a variable, you would use %LET.
In the case of the counter variable, %LET is un-necessary element, as the assignment is made within the %DO loop. However, for the sake our example, let’s say that we wanted to create a new variable which has its value derived from the “I” variable.
%let y = &I + 1;
While creating this variable in such a manner will return no errors, the way in which it is defined will return the value:
“<valueofI> + 1”;
Instead of the sum value of “I” + 1.
To fix this, you need to add %eval function.
%eval tells SAS to evaluate the data within the functional parameters.
So:
%let y = %eval (&I + 1);
Will provide SAS with the sum value of I+1. Let us add it to our macro.
%MACRO DATABLOG;
%DO I = 1 %to 5;
%let y = %eval (&I + 1);
So now, what function do we want our macro to perform?
For the sake of our example, let’s say that you want to compare values across 6 adjacent variable columns which contain numerical values. If the first a value within a column is equal to an adjacent column within any row, a new variable “Value1Flag”, is given the value of “1”.
%MACRO DATABLOG;
%let y = %eval (&I + 1);
If num&I = num&y then VALUE1FLAG = 1;
Now we need to wrap up our function. First, we will close the %DO loop with an %END. Then, will end the macro with a %MEND.
%MACRO DATABLOG;
%DO I = 1 %to 5;
%let y = %eval (&I + 1);
If num&I = num&y then VALUE1FLAG = 1;
%END;
%MEND;
So for the sake of examples, I've created the following SAS data set. The name of the set is test1.

To initialize the macro, simply run the code line:
%<name of the macro>;
However, our macro on its own does very little, as it has no data set to assess. Let's place it in the middle of SAS code block and run the entire program.
Set test1;
%datablog;
Run;
The new data set should resemble the image below:

With this information, you should be armed with the ability to create basic and powerful SAS macros. More SAS macro examples will be displayed in future entries.
SCAN / SUBSTR (SAS)
SCAN – returns a specified word from a character value.
SUBSTR – extracts a substring or replaces character values.
SCAN
The SCAN function is utilized as follows:
SCAN(<THE COLUMN TO SCAN>, <ORDER OF VALUE WHICH SCAN WILL RETURN>, <DELIMITER>);
Now to send the function into action in the following example set:

For the sake of this demonstration, let’s say that you wanted to scan the “Name” column variable for the middle initial of each individual listed. Once this initial has been identified, you would like to have it a new variable created to house its value.
There are two ways to perform this task utilizing SCAN, the first way is to have SCAN from left to right.
SCAN(Name, 3, ‘ ‘ );
The second method scans from right to left:
SCAN(Name, -1, ‘ ‘ );
In each case, SCAN scans the NAME column for data while utilizing a blank space as the delineator. The first method scans for the third sting of data, occurring after two blanks, and reads it. The second method, scans for the first string, occurring before a blank, and reads it.
To utilize these functions while also creating a variable to house the data of each string returned, you will need to write code similar to the code listed below:
Data TEST2;
Set TEST;
Length MI1 MI2 $ 10; /* 10 is excessive. However, you should get into the habit of setting lengths for variables that you will later create. */
MI1 = SCAN(Name, 3, ' ' );
MI2 = SCAN(Name, -1, ' ' );
Run;
Another demonstration of how SCAN can create a variable to house the city string from the address variable column.
Scanning left to right.
City = SCAN(Address, 2, ',' );
Scanning right to left.
City2 = SCAN(Address, -3, ',' );
In each case, the SCAN function utilized a comma as a delineator.
SUBSTR
The SUBSTR function, or the substring function, is commonly utilized to check for a single character value. However, it can also be utilized to check for multiple character values, or to replace character values.
The SUBSTR function is utilized as follows:
SUBSTR(<THE COLUMN TO SCAN>, <POSITION IN WHICH TO BEGIN RETURNING CHARACTERS>, <NUMBER OF CHARACTERS TO RETURN>);
In the case of our example set, let’s say that you wanted to create a variable which houses the first letter of the last name of each individual listed within the name column.
MISUB = SUBSTR(NAME, 1, 1);
Or you could create a variable which houses the first 3 characters of an address from the address column.
ZIP5 = SUBSTR(Address, 1, 3);
Or for whatever reason, you decided that every address number to 777.
SUBSTR(Address, 1, 3) = ‘777’;
SUBSTR – extracts a substring or replaces character values.
SCAN
The SCAN function is utilized as follows:
SCAN(<THE COLUMN TO SCAN>, <ORDER OF VALUE WHICH SCAN WILL RETURN>, <DELIMITER>);
Now to send the function into action in the following example set:
For the sake of this demonstration, let’s say that you wanted to scan the “Name” column variable for the middle initial of each individual listed. Once this initial has been identified, you would like to have it a new variable created to house its value.
There are two ways to perform this task utilizing SCAN, the first way is to have SCAN from left to right.
SCAN(Name, 3, ‘ ‘ );
The second method scans from right to left:
SCAN(Name, -1, ‘ ‘ );
In each case, SCAN scans the NAME column for data while utilizing a blank space as the delineator. The first method scans for the third sting of data, occurring after two blanks, and reads it. The second method, scans for the first string, occurring before a blank, and reads it.
To utilize these functions while also creating a variable to house the data of each string returned, you will need to write code similar to the code listed below:
Data TEST2;
Set TEST;
Length MI1 MI2 $ 10; /* 10 is excessive. However, you should get into the habit of setting lengths for variables that you will later create. */
MI1 = SCAN(Name, 3, ' ' );
MI2 = SCAN(Name, -1, ' ' );
Run;
Another demonstration of how SCAN can create a variable to house the city string from the address variable column.
Scanning left to right.
City = SCAN(Address, 2, ',' );
Scanning right to left.
City2 = SCAN(Address, -3, ',' );
In each case, the SCAN function utilized a comma as a delineator.
The SUBSTR function, or the substring function, is commonly utilized to check for a single character value. However, it can also be utilized to check for multiple character values, or to replace character values.
The SUBSTR function is utilized as follows:
SUBSTR(<THE COLUMN TO SCAN>, <POSITION IN WHICH TO BEGIN RETURNING CHARACTERS>, <NUMBER OF CHARACTERS TO RETURN>);
In the case of our example set, let’s say that you wanted to create a variable which houses the first letter of the last name of each individual listed within the name column.
MISUB = SUBSTR(NAME, 1, 1);
Or you could create a variable which houses the first 3 characters of an address from the address column.
ZIP5 = SUBSTR(Address, 1, 3);
Or for whatever reason, you decided that every address number to 777.
SUBSTR(Address, 1, 3) = ‘777’;
Library Assignment Basics (SAS)
A common error that is often encountered by novice SAS programmers, is the utilization of the SAS Enhanced Editor UI to assign libraries. As you are probably well aware, unless programmed otherwise, SAS only maintains the “Work” Library between sessions. Since the “Work” Library is only a temporary cache, recognizing and maintaining libraries at the beginning of each SAS session is an absolute necessary.
The cumbersome way to assign a library through the SAS UI is to follow the steps below (FOR DEMONSTRATION PURPOSES ONLY. DO NOT ASSIGN LIBRARIES IN THIS WAY):
In the SAS Enhanced Editor, click the “Tools” menu drop down. This is the fourth option from the left.

From this menu, click “New Library”.
Once this has performed, you should be presented with the menu:

Simply name your library*, and choose the established pathway. After clicking “OK”, assuming that there were no errors, SAS should have assigned the library. No messages indicating this will be printed to the SAS log. Therefore, you must manually check the graphical interface by clicking on “Libraries” within the “Explorer” window.


Assigning Libraries the Right Way
A much easier method for library assignment is to utilize program code within the program that you are creating. I believe that the best play to create this assignment is within the program header.
The code line to assign libraries is:
Libname <NAMEOFYOURLIBRARY> “<path of your library>";
In the case of our previous example, this would resemble the following:
Libname Test “H:\TestLib”;
Running this line independently will produce the following log window message:

*Library naming limitations
A SAS Library name is 1 to 8 characters long, begins with a letter or underscore, and contains only letters, numbers, or underscores. Not complying with these rules is typically what causes errors when assigning SAS libraries.
Assigning Libraries the Right Way
A much easier method for library assignment is to utilize program code within the program that you are creating. I believe that the best play to create this assignment is within the program header.
The code line to assign libraries is:
Libname <NAMEOFYOURLIBRARY> “<path of your library>";
In the case of our previous example, this would resemble the following:
Libname Test “H:\TestLib”;
Running this line independently will produce the following log window message:
*Library naming limitations
A SAS Library name is 1 to 8 characters long, begins with a letter or underscore, and contains only letters, numbers, or underscores. Not complying with these rules is typically what causes errors when assigning SAS libraries.
Thursday, April 20, 2017
( SYMBOLGEN MPRINT MLOGIC MCOMPILENOTE MSGLEVEL ) Macro Debugging Options (SAS)
In future articles, I will be discussing and displaying some of the macros that I have created and often utilize. In the interim, I would like to list a few options that can be enabled in the header portion of SAS programs, that I feel, make macro usage/writing/debugging much easier.
These options are listed above the code, in the header portion of every program that I write. Below is a brief description as to what each option enables.
SYMBOLGEN – Displays the results of resolving macro variable references.
MPRINT - Displays the SAS statements that are generated by macro execution.
MLOGIC - Specifies that the macro language processor trace its execution and write the trace information to the SAS log.
MCOMPILENOTE - Will cause a note to be issued to the SAS log when a macro has completed compilation.
MSGLEVEL (I)- Specifies to print additional notes pertaining to index usage, merge processing, and sort utilities, along with standard notes, warnings, CEDA message, and error messages.
MSGLEVEL is not macro specific, but I recommend enabling it for its general usefulness. This option simply prints additional messages to the SAS log as the SAS application processes code.
The other options listed are specifically related to macro usage and compiling.
MCOMPILENOTE is especially useful as it notifies the user, by writing a message to the SAS log, as to whether or not a macro compiled correctly.

When the SYMLOGEN, MPRINT, MLOGIC, and MCOMPILENOTE are enabled in tandem, and a macro is processing data, your log window should resemble something similar to:

To enable each of these options individually or together, utilize the code below:
Option SYMBOLGEN MPRINT MLOGIC;
Options MCOMPILENOTE = ALL;
Options MSGLEVEL = I;
OPTION NoThreads; (and) OPTION NoQuoteLenMax; (Esoteric Errors): (SAS)
The above listed options can be found in the header of every SAS program that I create. Strangely, though the options listed are extremely important, most SAS programmers overlook their existence. The reason for such, is likely due to neither option being discussed in any SAS material that I’ve come across.
What do these options achieve?
OPTION NoThreads;
This option disables threaded processing within the SAS application. Essentially, what this means, is that additional CPU resources will be needed for running SAS programs, and as a result, programs will take longer in real time to complete. So why utilize this option?
From my experience, when using PROC SQL to perform functions on large data sets, there have been numerous instances where threading has caused the data set that I am referencing, to become corrupted. There are ways to repair corrupted data sets within SAS, however, I have never been able to successfully repair data through the various methods that SAS provides. Therefore, to reduce/eliminate the risk of this occurring, I always activate the NoThreads option before I begin my initial coding.
OPTION NoQuoteLenMax;
This option disables SAS from displaying error warnings that terminate processing such as:
WARNING 32-169: The quoted string currently being processed has become more than 262 characters long. You may have unbalanced quotation marks.
This error is caused by an aspect of SAS functionality, a SAS limits the amount of characters that you can utilize when programming code that contains quoted strings.
From my experience, this error typically happens when applying formats which have extremely long lengths. For example, if you are applying a format which provides a lengthy description to a coinciding variable, you will likely run into a message similar to the one above.
Therefore, I always enable this option to prevent this error from occurring. Why SAS included this interesting bit of functionality as an initially enabled option is beyond me. However, it is best not to ask these questions, and to avoid the issue completely by utilizing OPTION NoQuoteLenMax.
SAS Import Wizard (SAS)
In various SAS books, you will be taught methodologies that can be utilized to import foreign file types into SAS. While these methodologies have a certain usefulness, often, unless dealing with a very exotic file structure, SAS’s built in “Import Wizard” should be able accomplish the task of importing.
However, the Import Wizard, being an automated tool, is given the jurisdiction to decide variable length, format, and informat without user discretion. Therefore, running Import Wizard without checking the SAS log and the data set itself, is a risky and reckless proposition. In this article, I will demonstrate how to utilize Import Wizard, and how to effectively modify the code that it provides the user.
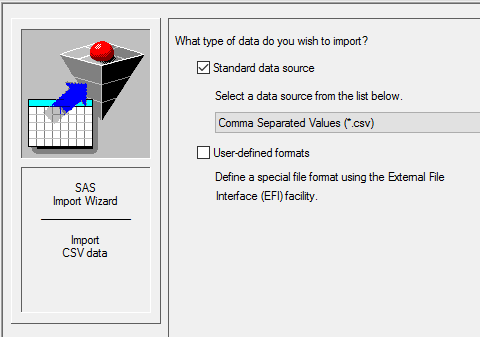
First you will need to initiate the Import Wizard. The command to run this tool is located within the SAS Enhanced Editor. From the top left file menu dropdown, choose “Import Data”.

Next, you will be prompted to select the type of data file that you wish to import. I would recommend always using .csv for this particular task.
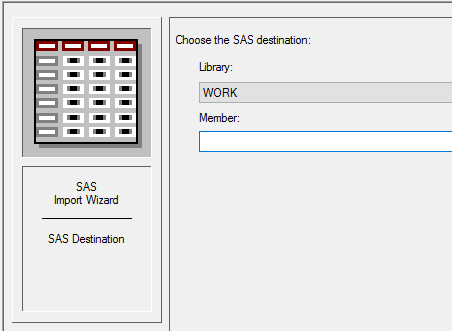
Next you will be prompted with a screen that asks you to provide the pathway to the file. After you have provided this information, you will encounter another screen that prompts the user to select which SAS Library the new data set should be created in, and what the name of the data set should be.
If the import has been successful, the data should should appear within the SAS library that you selected. Additionally, text should appear within the SAS log that illustrates the code generated by the Import Wizard. This is the code that the Import Wizard created and utilized in its importing task.

Blue text (not shown) should be show beneath the code output in the log. This text indicates record length, the date that the original imported file was created, the maximum record length, the minimum record length, the number of observations, and the number of variables.
Often, as previously mentioned, the Import Wizard may utilize formats and lengths which are either un-suitable for the user's needs, or compromise data integrity. Fortunately, since the code created by the automation is printed to the SAS log, editing the code is possible.
To begin, copy the generated code from the SAS log to a text editor program. Once this has occurred, there are a few step that must be taken before the code can be edited and re-processed.
First, you must delete all of the line numbers listed to the right of the code. Also, all of the system data that is contained between the ‘*’, including the ‘*’ itself must be deleted. Finally, and most importantly, you must delete the singe ‘!’ that is shown in the illustration below. Failure to do so will cause your program to terminate without processing.

Once this has been accomplished, you should be left with code that resembles.

Now you will have the opportunity to modify the variables and their characteristics as you see fit. Once the code editing is complete, copy the code from the text editor back into the SAS Enhanced Editor program window. Run the code. If the code contains no user generated errors, the new data set should overwrite its previous incarnation in the SAS user library.
Wednesday, April 19, 2017
Drop and Keep (SAS)
In a previous article, I discussed how to re-arrange columns within SAS. Also discussed previously, was a method that allows for the re-formatting of column data. The latter utilizes the DROP statement. In this article I will discuss how to optimally utilize both the KEEP and DROP statements within SAS.
Keep
Keep instructs SAS to keep the variables which are specified within a newly created data set, all variables which are not referenced are deleted.
Keep, like Drop, can be utilized either in a DATA step or in a SET step. The difference between the placement of the statement is critical.
Ex.
Data SetA (Keep = VARA VARB VARC); /* No commas, but parentheses and “=” are utilized */
Set SetB;
Run;
(OR)
Data SetA;
Set SetB;
Keep VARA VARB VARC; /* No commas, parentheses or “=” */
Run;
In the first example, the data variables in the KEEP statement are referenced before the data is read to create the new set. Meaning, that all variables not referenced within the KEEP statement are never read at all when the new set is being created. When referencing a larger set to create a smaller sub-set, the placement of the KEEP statement could save a large amount of time in processing.
In the second example, the data variables in the KEEP statement is referenced after the data set has been created. First the data set is compiled in full, after which the KEEP statement is utilized.
In both cases, only the variables: VARA, VARB, VARC will remain in SetA, all other variables from the original set, SetB, will be removed.
Drop
Drop instructs SAS to drop the variables which are specified, thereby removing their inclusion from a newly created data set, all variables which are referenced are removed.
The placing of a Drop statement within a SAS code block is more important than Keep statement placement. The reason for such, is that often when creating new data sets, variables will be utilized from the prior set to create new variables. This means, that if some of the variables in SetB are referenced to create new variables in SetA, that the data variables must be dropped after the variables which referenced their values are created.
Ex.
Data SetA (Drop = VARA VARB VARC); /* No commas, but parentheses and “=” are utilized */
Set SetB;
VARD = VARA + VARB; /* VARD will not be created correctly in the new set because VARA and VARB are dropped prior to VARD’s creation */
Run;
(OR)
Data SetA;
Set SetB;
VARD = VARA + VARB;
Drop VARA VARB VARC; /* In this case, VARD will be created correctly as the reference variables are dropped after VARD’s creation */
/* No commas, parentheses or “=” */
Run;
Armed with the understanding of this knowledge, you can push forth as a SAS programmer, instructing SAS to create custom data sets which suit your specific needs and preferences.
Excel Sort & Filter / Freeze Planes (MS-Excel)
This article addresses two very simple but very useful concepts for organizing small data sets within Excel.
Freezing Panes

When dealing with sheets that contain numerous column variables that contain large numbers of observations, it can be quite easy to scroll downwards, and in doing so, forget exactly what variable each column represents.

The “Freeze Panes” option exists as a way to remove this ambiguity in order to more easily keep track of column variables. This option can be enabled within the “View” Ribbon.

Typically, you will be selecting the first option which freezes the first row of all columns. This allows the user to scroll downwards while being able to reference the variable name represented in each column. To disable the option, simply select it again from the “View” Ribbon once it has already been enabled.

Sort & Filter
Referring again to column headers, let’s say that you wanted to easily sort by a particular variable in each column and view the observational (row) data that pertains to the variable selection. An easy to accomplish this is to utilize the “Sort & Filter” option within Excel. This option can be found within the “Home” Ribbon.
First, select the column headers (variables) of the Excel sheet that you wish to sort by.

Next, select “Sort & Filter” from the “Home” Ribbon Menu within Excel. From the drop down, select “Filter”.

Once this has been accomplished, each variable should have a drop down menu associated with it.

Clicking on these menus allows you to select the variable data that you wish to sort by. In our example, we will sort by individuals who utilize Python as their favorite programming language.

The funnel icon in the upper right hand corner of the drop down variable menu indicates that the data has been sorted. If necessary, multiple sorts can be performed within the sheet by selecting multiple variables to sort by. In the case of our example, we will be sorting by individuals who prefer Python as their favorite programming language and also prefer Red as their favorite color.

The result of this sort will resemble:

To reset the sorts, click “(Select All)” in the selection box of each drop down that has a sort currently enabled.
Two aspects to be aware of, data sets that are on the larger side will be slow to sort and could potentially crash Excel when the option is utilized. Also, sorting by multiple variations of the same variable is also possible, meaning, that multiple observation variations within the same variable can be selected at once. For example, you could sort by individuals who either prefer the programming languages Python or Java. Then, from the data sorted within that query, you could sort by favorite color.

The Sort & Filter feature of Excel is one of its most useful options, make sure that you do not overlook the potential of this particular feature when working with Excel data.
Tuesday, April 18, 2017
Clearing Temporary SAS Files (SAS)
If you are like me, and typically work with very large data sets, you may run into issues with SAS grinding to a halt due to a lack of hard drive space on your primary local disk.
There are two options that can rectify this dilemma.
The first option is to clear your computer's “SAS Temporary Files” folder.
First you must locate the “SAS Temporary Files” folder. This can be achieved through utilizing the Windows search feature. Once you have located the file, I would recommend creating a shortcut to the location on your desktop. From this shortcut, you will be able to delete the contents of the folder.
The second option is slightly more difficult and involves changing the SAS ‘Work’ Directory. SAS, for whatever reason, neglected to present the user with this option from within the SAS Enhanced Editor. Instead, you will have to search for the:

“sasv9.cfg” file on your hard drive.
Once you have found this file, I would recommend making a back-up copy of it elsewhere on your computer. The file can only be opened with a notepad or text editor.
Once the original file is open, it can be edited. Below is a link to The SAS University website which provides further instructions.
You will only be able to re-save this file as text document within the SAS program directory. In order to ensure that the file can be read correctly by SAS, you will need to enable the Window’s 10 option which allows for file extensions to be viewed and modified by the user. Once this extension is enabled, you will have the ability to edit the extension back to a .cfg.

After you have completed this step, delete the original non-copied version of this file within the SAS directory, as you do not want two of such files to exist concurrently.
Another less difficult option to clear disk space, is to run the Window’s Disk Cleanup utility. To find this utility, on Windows 10, type “Disk Cleanup” into the Cortana search bar on the desktop. Disk Cleanup usually only frees up a marginal amount of space on the primary local drive, but running it can do no harm, so why not?

Another less difficult option to clear disk space, is to run the Window’s Disk Cleanup utility. To find this utility, on Windows 10, type “Disk Cleanup” into the Cortana search bar on the desktop. Disk Cleanup usually only frees up a marginal amount of space on the primary local drive, but running it can do no harm, so why not?
Monday, April 17, 2017
How to Drop Tables (SAS / SQL)
For example, if you wanted to delete the data set, TABLEA, you would only need to run this simple line of code:
Proc SQL;
Drop table TABLEA;
Quit;
PROC SQL invokes the SAS library pertaining to SQL, DROP TABLE specifies the table to be deleted, and QUIT ends the SQL emulation. It is important not to neglect the QUIT statement. If neglected, the SAS compiler will continue to run in the background of the SAS platform while you are working.
I often utilize the drop statement, even when not running macros, simply because it is easier for me to keep track of data sets that I have deleted. Additionally, if space is a concern, and you need to re-compile your code from top to bottom, the drop statement will make sure that your drive does not run out of memory during the compilation phase.
A best practice that I recommend, when using the DROP statement within your code, is to notate exactly why you are dropping the tables that your statement specifies.
Ex.
Proc SQL; /* Tells SAS that we will be utilizing SQL functionality */
Drop table TABLEA, TABLEB, TABLEC; /* Drop table(s) TableA, TableB, TableC. These tables are combined in TableD (in the case of this example). */
Quit; /* End compiling/processing */
Hopefully you have found this article helpful. Remember, even if you are dropping multiple tables, the SQL statement will always read: DROP TABLE. The plural, "tables", even though grammatically correct, never applies.
Basic VLOOKUP (MS-Excel)
A very important function that every data scientist should be aware of, as it is very helpful when compiling small data sets, is the VLOOKUP function within Excel. Essentially what this function allows the user to achieve, is the comparison and matching of data from one Excel workbook to another.
For our sample demonstration, let’s imagine that you have data within one Excel workbook that contains various types of cars within your dealer inventory. The second workbook contains the amount of those cars previously sold from your inventory. When comparing matching car variables, instead of having to painstakingly read off of one sheet and manually enter or paste the values of matching entries into the first sheet, you can utilize VLOOKUP.
Example Sheet 1:
Example Sheet 2:
First, you will need to decide on the destination cell for the data that you will be referencing. In the case of our example, the destination cell will be cell C2 on sheet1 of workbook1. The data being referenced exists on sheet1 of workbook2. For this example to work, and for VLOOKUP to work in general, THE DATA BEING REFERENCED MUST BE LOCATED ON A SEPARATE SHEET OF A SEPARATE WORKBOOK.
The VLOOKUP example looks complicated but don't be intimidated, the VLOOKUP function is actually incredibly easy to utilize.
There are 4 variables that must be entered within the VLOOKUP function for it to work properly.
=VLOOKUP(A,B,C,D)
A. Refers to the column that will act as the primary key for the data set on workbook1. In the case of the example, we are selecting multiple cells within the same column. To re-create this step of the scenario, type =VLOOKUP into the C2 cell and click on cell A2. Now drag the selection downward to include all variables listed within the A column. After you have finished this task, place a comma.
B. Refers to the group of columns that will be referenced in comparison to the A column within workbook1. In the case of the example, I clicked on cell A2 of the sheet on workbook1, and drug my pointer selection over to also select B2. After such, I pulled the selection down to include all of the variables within the A and B columns which existed below the column titles. After this task is completed, place a comma.
C. The first column that is selected in the second workbook acts as the primary key for workbook2. The C variable indicates the column number, from left to right, that will be referenced when the first column of the workbook2 matches the column selected to be the primary key in workbook1 (Column A). After this task is completed, place a comma.
D. You will always want to type FALSE for this portion of the function. This essentially instructs Excel that both primary keys much match exactly to be considered a match. All matches will display the referenced column results within the destination cell.
One final important note, the data referenced in the C column of worksheet2 is just that. Which means that, as soon as the second sheet is deleted, or both workbooks are closed, that the data reference will be lost. To prevent this from happening, select the entire column of destination data (C column) and select Copy. Then paste the data back on top of the referenced data as values. This makes the data permanent and not a temporary reference. If you need a better explanation pertaining to this step, there is an additional article on this blog that explains the concept in greater detail.

With basic mastery of the VLOOKUP function, you should have a much easier time working through the nuances of Excel while navigating small data sets.
Running Macros Overnight (SAS)
As this pertains to SAS Programming, there are few tips that I recommend before running overnight macros on large data sets.
Use OBS =
If it is the size of the data set that creates the processing slowdown, as it often is, then it is probably best to create a test data set for processing prior to running the macro on the original set.
I typically would recommend creating a new set utilizing the first 1,000 – 10,000 observations from the original dataset, and then subsequently running the macro on the test set before proceeding.
To create a test set using the OBS function, utilize the sample code below:
Data SETB;
Set SETA(obs = 10000); /* Reads the first 10000 observations from SETA and creates SETB */
Run;
Now run your macro, and make sure that the code performs the task for which it was created.
Prevent Log from Printing
By default, SAS will halt processing when the output log reaches a set limit. At this point, the user will be prompted with the following dialogue box.

If the user is not present to make a selection, the program halts until prompted otherwise. I neglected to consider this SAS feature when I was a relatively novice programmer, and as a result, I came in one morning to find that a perfectly functional macro that I had ran overnight, never completed processing.
To avoid a similar fate, I would STRONGLY recommend enabling this option prior to running your macro code overnight.
This option prevents messages from being written to the SAS log. Therefore, by enabling this option, such as in the example below, you can sleep easily knowing that your code will run seamlessly, and without SAS system interruptions.
/* Add the following OPTIONS statement to the top of your SAS program to suppress printing to the log: */
options nonotes nosource nosource2 errors=0;
/* If you want to change the options back to the default and start printing to the log again, submit the following OPTIONS statement: */
options notes source source2 errors=20;
It should be noted that green text generated within the SAS log will not be prevented from displaying, even with the above listed option toggled. (Blue text will not be displayed). Therefore, to be absolutely sure that your macro runs without ceasing due to a full log prompt, I would recommend potentially placing one of these code lines within your macro:
DM "Log; Clear; "; /* Clears the SAS log only */
/* OR */
DM Log "Out; Clear; Log ; Clear;"; /* Clears both the SAS log and the SAS output window */

(Green Text)
(Blue Text)
It should also be noted that text generated from options utilized and enabled for Macro debugging will still run, and still generate text to the SAS log, even if the option above is enabled.

Therefore, I recommend the following complete set of steps for running macro programs overnight:
1. Compile the macro in your current SAS Session with macro debugging options enabled, be sure that there is (DM "log; clear; ";) somewhere within your macro code.
2. If the macro compiled correctly, test your macro on a smaller variation of your current dataset by utilizing the OBS = option. If successful, save your work and exit completely out of SAS.
3. Re-open SAS and the program that you were previously working on. Re-establish the libraries and the options utilized in the prior session. DO NOT re-enable macro debugging options.
4. Re-compile the macro.
5. Clear the SAS Log.
7. Be sure that (options nonotes nosource nosource2 errors=0;) is enabled.
8. Run the macro code.
If you follow these steps, hopefully your overnight macro running will process with ease and without error.
Friday, April 7, 2017
Re-Ordering SAS Columns (SAS)
Data SETB;
Retain X Y Z W;
Set SETA;
Run;
SETB being the name of the new set that will contain the re-ordered variables, SETA being the set that requires the variables to be re-ordered.
Unlisted variables that existed in the prior set will still remain in the new set, even if not listed within the RETAIN statement, however, they will be listed at the very end of the set.
SAS Retain Statement: SAS University
Wednesday, April 5, 2017
Formats the Easy Way (SAS)
For example let’s say that you have a SAS data set that contains minor league hockey players, their primary position, and their favorite beverage.

Now, let’s say that you would like to create a new data set that displays the full title of the player position instead of the abbreviation.
The example that I am providing contains only a few observations. The methodology that I will be demonstrating is more useful when formatting larger sets.
Step 1: You will need a list of the distinct variables that you wish to provide formats. This can be accomplished by running a PROC FREQ on the data set.
In the case of our example, the code would look like:
Proc Freq Data = MinorLeague;
Tables Player_Position;
Run;
The output should resemble something such as:

You now need to highlight the data output with your mouse and copy (Ctrl + C) it to a Microsoft Excel workbook (Ctrl + V).

Once this has been established, we can move on to Step 2.
Step 2: Assuming that you do not have an already pre-established list of formats existing within an Excel workbook, you will have to create the format entries manually within Excel. Simply type the format that you wish to apply in a column adjacent to the variable name that you would like the format to be assigned to.
Step 3: Utilize the concatenation function provided by Excel to create a new column containing the following the data. The final goal of such is to create a variable that can be utilized in the creation of a format. In the case of our hockey player position example, you would want to use the Excel concatenation function to format the data.

Step 4: Once you have completed the previous step, you will want to complete the formatting code within the Excel Workbook. The reason for writing the code in Excel is due to SAS’s tendency to slow down/freeze when there is too much typed within an enhanced editor window. Completing the code in Excel allows you to copy and paste the finished product directly into SAS and then immediately save it.

Step 5: Copy and paste the cells that contain the format code into the SAS editor. Next save the SAS code file.

Now instead of having to mess around with SAS Libraries and other methods of invoking SAS formats, the format can be directly invoked from its file path by utilizing %INCLUDE. Simply place the following code in the header portion of your code:
%INCLUDE "<path of code format destination>";
Highlight the code and run it to invoke the format.
Next, all that is necessary to continue is to create a new data set that applies the format.

The final version of the data set will resemble:

Utilizing this method to create formats and import them through the utilization of the %INCLUDE Statement, I feel, creates cleaner and more universalized code.
Concatenation (MS-Excel)
Knowing how to utilize the concatenation function is incredibly important and time efficient when it comes to creating formats within SAS. Why this is the case is will be discussed in a separate article.


The final product will resemble the following:

Of course, if you would like, the formula can be dragged down so that if effects all destination columns in a vertical or horizontal fashion.
However, the CONCATENATE function within Excel is nevertheless important and should be understood.
For example, let’s say that you have the following values in an Excel Workbook:
And you want to have C3 act as a destination for the concatenated phrase, “This Tree is Red”. To accomplish this, you must enter the following code into the destination cell (C1).
=CONCATENATE(A2, “ is “, B2)
=CONCATENATE(A2, “ is “, B2)
This informs Excel that it must make a new value which contains the values for:
A2 = This Tree
“ is “
B2 = Red
The illustration below shows what this would look like within Excel:

The final product will resemble the following:
Of course, if you would like, the formula can be dragged down so that if effects all destination columns in a vertical or horizontal fashion.
Subscribe to:
Posts (Atom)